Wednesday, July 31, 2019

3 Ways to Find Apple ID Password


Find Apple ID Password from Two-factor Authentication for iOS 10 or Later

Two-factor authentication on your iPhone or iPad is extra security for your Apple ID. It ensures that your Apple ID and iCloud account can only be allowed to log into your trusted Apple device. You will be required to enter your Apple ID password and 6-digit verification code when you sign in your Apple ID on a new Apple device. It prevents an unauthorized user from accessing your account by cracking your Apple ID password.

Fortunately, if you can access an Apple device that has been trusted by your Apple ID, and you know its screen passcode, you can use it to find Apple ID password. You just need to take the steps below.

Step 1. Please make sure your device is running on iOS 10 or later and you have enabled two-factor authentication on your iDevice.

Step 2. Go to "Settings > [Your Name] > Password & Security" on the trusted Apple device.

Step 3. Click on "Change Password".


Step 4. Enter the screen passcode on your iPhone or iPad.

Step 5. Enter your new Apple ID password and re-enter to confirm.
Find Apple ID Password from Two-step Verification for iOS 9 or Earlier

2-step verification is a security feature for Apple ID that designed to prevent unauthorized users from accessing your account, even if someone else knows your password. It requires you to verify your identity using another device that trusted by this Apple ID. 2-Step verification is a relatively old security feature in the iOS system.

You have received a Recovery Key with 14 characters from Apple after setting up 2-step verification. It can be used to find Apple ID password. If you have still kept the Recovery Key, you can follow the steps below to change your Apple ID password.

Step 1. Open Safari on your device and go to iforgot.apple.com.

Step 2. Enter your Apple ID and click on "Continue".

Step 3. Click on "Change Password".

Step 4. Enter your Recovery Key for two-step verification (14 characters).


Step 5. Select a trusted device. Apple will send you the verification code.

Step 6. Enter the verification code on your trusted Apple device. Then you can change your Apple ID password.
Find Apple ID Password by Security Questions or Email

If you have set a security question or email for your Apple ID, you can use this method to find Apple ID password. It is suitable for all iOS versions.

Step 1. Go to Apple ID page. Click on "Forgot Apple ID or password".

Step 2. Enter your Apple ID. Choose "Reset Your Password, then tap on "Continue".

Step 3. Click on "Change Password".

Step 4. Choose from "Answer security questions" and "Get an email" according to your situation.

Step 5. Then you can reset your Apple ID password.


The Easiest Way: Remove Apple ID Directly without Password

If you lost data after you updated to a new iPhone, you can always use Gihosoft iPhone Data Recovery to get the data back from the old iPhone or backup.You may also like: iphonerecovery.com

Wednesday, July 24, 2019

7-Eleven Giving Away AirPods to First 500 7NOW App Customers Tomorrow


If you are looking to score a free pair of AirPods, you should use the 7NOW app on your iPhone tomorrow and place an order that’s worth at least $50.

7-Eleven has announced that it will offer the first 500 customers who place an order worth at least $50 using its 7NOW app tomorrow a free pair of AirPods. The company will give the second-generation AirPods with the regular charging case that’s usually worth $129.Also Read:fastest smartphone processor

The offer is valid on a first-come, first-serve basis and it is limited to U.S. customers who are 18 years or older. This means that solely placing an order that’s worth more than $50 won’t guarantee you a free pair of AirPods.
The company will send out a flash notification to all users who have the 7NOW app installed on their iPhone when the deal begins on July 25.

7-Eleven will announce the winner within 72 hours, with the delivery of the AirPods taking around 4-6 weeks.

You can find the entire terms and conditions of the AirPods deal here.

[Via Delish]

Wednesday, May 8, 2019

How to Forward Voicemail on iPhone


How to Forward a Voicemail to Email

Forwarding voicemail to your email on your iPhone is a straightforward task you can achieve within a couple of minutes. For those who haven’t done this before but want to give it a try, the following steps will prove worthwhile.

Step 1: Start by opening your phone app; the app is usually located at the bottom of the screen when your phone is unlocked.

Step 2: Navigate to voicemail.

Step 3: Select the voicemail you’ll like to send.

Step 4: Select email and type in the recipient’s email.

Step 5: Send when the email is ready. Make sure you have a stable internet connection before you hit the send button.


How to Automatically Forward iPhone Voicemail to Email

Don’t have time to do this manually? Well, we are glad to let you know that you can automatically set up your voicemail to forward to email.

Although it is a little complicated, there are lots of apps out there that can get this task done with a few taps. While some of the apps offer users free services with paid options, others require users to pay before they can enjoy their services.

For iPhone users, who want to forward all voicemail received, you’ll need to go beyond using the basic voicemail services offered by Apple. To this end, you may want to consider apps like Google voice, YouMail or Hullomail.

These apps provide users with lots of exciting services besides just forwarding your voicemail to the app or email. These apps can transcribe voicemail, send SMS, reply voicemail and do lots of incredible stuff. All the apps we have mentioned have their unique features, so all you need to do is to decide which one may work for you.
Recover Lost iPhone Data in Your Daily Life Note Tips:Best 21 sites watch soccer live tv

Losing your iPhone data can be such a hard nut to crack, and you wouldn’t like that would you? There are now lots of amazing software out there that allow users to recover lost data with just a few clicks. So, depending on what works for you, you’ll definitely find a software that can help you.

For iPhone users who do not mind losing data but simply want to restore the iPhone to work normally again after noticing a glitch, you can choose to restore your iPhone using iTunes and iCloud backups fully. This process is super effective and will fully restore your phone in minutes, but you will end up losing your phone data. So you should have this in mind before making any decision regarding using the restore method.


For iPhone users who want to recover their iPhone data without restoring backups, we have found an amazing software that allows you to make it with simple steps. With this method, you can be able to recover more than 18 data types of your lost data.

Note Tips: Top 3 Alternative Sites to TamilDbox 2019

Also Read:8 Best Chess Apps for iPhone & iPad 2019

Also Read:Recover Your Forgotten Apple ID and Password

Also Read:Top 5 Best Similar Sites to Kickass Torrents 2019

Also Read:10 Best Free Music Download Sites That Are Totally Legal

Also Read:12 Best Free Instagram Followers Apps for Android and iPhone in 2019

Also Read:How to Play Android Games and Run Android Apps on PC or Mac

Also Read:Top 5 Best Free File Encryption Software for Computer in 2019

Sponsor ads:

Gihosoft RePicvid Free Photo Recovery Software provides a free photo recovery software for windows to help users recover the deleted or lost photo for free.

If you lost data after you updated to a new iPhone, you can always use Gihosoft iPhone Data Recovery to get the data back from the old iPhone or backup.You may also like: iphonerecovery.com

If you use android phones, please choose Gihosoft Android Data Recovery.With Gihosoft Android Data Recovery, no longer afraid of data loss!

iPhone Manager:Get the ultimate Gihosoft iPhone Manager. Free download for PC/Mac.

Monday, March 4, 2019

How to Add a Device to iCloud from iPhone/Mac


iCloud is a cloud storage service designed for Apple devices. It is a service that keeps all your iOS devices in sync. This service has been around for years now, unfortunately, very few iPhone, iPod touch, and iPad users understand it and how it works. In other words, very few users know how to add a device to iCloud account or know how to use it in general. We will discuss the how to add a device to iCloud and some related topics which might help you to utilize iCloud better.


How to Add a Device to iCloud from iPhone/Mac?


How to Check Whether a New Device Is Added to iCloud?


How to Remove a Device from Your iCloud Account?

Also Read:Top 6 Best Vumoo Alternative Sites for You to Watch and Download Movies 2019

Also Read:How to Access and Unlock Android Phone with Broken Screen


Additional Tips about Your iCloud Account
1. How to Add a Device to iCloud from iPhone/Mac?

For you to add a device to iCloud you must have an iCloud account and set it up on your device. By creating an iCloud account, you will be given an Apple ID and password. To open an iCloud account, you can just go to www.iCloud.com then create an account. Next, you can set up iCloud on your device.
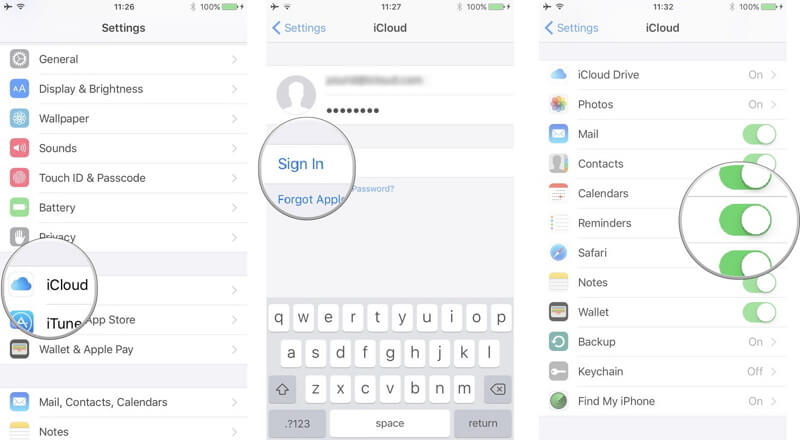
How to Add a Device to iCloud on iOS Device?


To set up iCloud for the first time, go to Settings then tap on iCloud, enter your Apple ID and password, then turn on the features you wish to use.


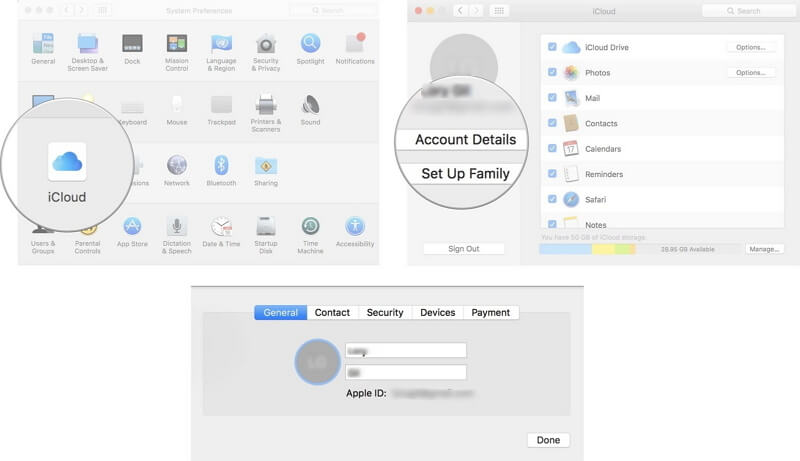
How to Add a Device to iCloud on Mac?


On your Mac, click on the Apple menu, then click on System Preferences, then tap iCloud and then enter your Apple credentials.


If you own more than one Apple device, for example, iPhone, iPod touch, iPad, Mac or an Apple watch, you do not require different Apple IDs for each device. A single Apple ID can be used across all these devices. You can use a single account to sync all your data and still access the same data using a different device. We will discuss how to check whether your device is added to iCloud account.
2. How to Check Whether a New Device Is Added to iCloud?

Once you have managed to set up iCloud on your device, the next thing you can do is to check whether a new device is added to iCloud. We will show you how to check devices connected to iCloud from iOS device or iCloud.com.
How to Check Whether a New Device is Added to iCloud on iPhone?


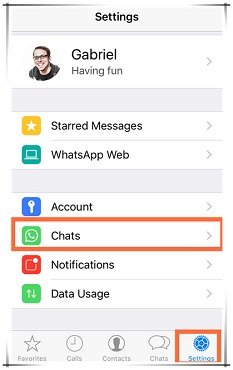
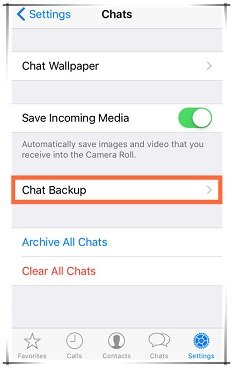
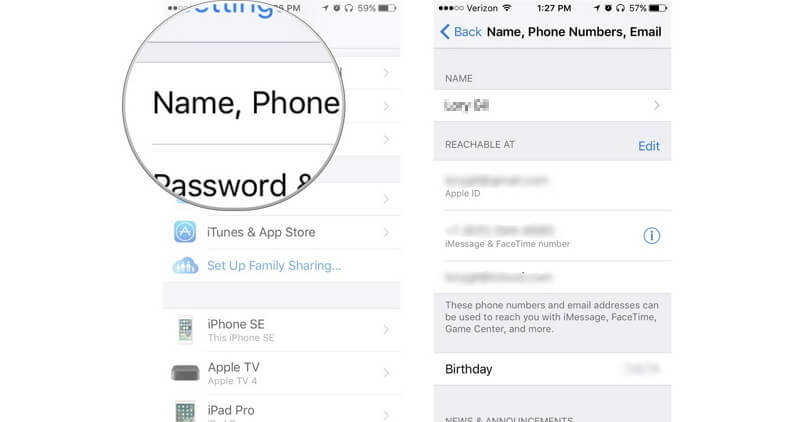
Open Settings from your Home screen.


Click on your Apple ID which is the name that appears at the top.


A list of devices linked to that Apple ID will appear including your iPhone/iPad/iPod touch, Mac, Apple watch, or Apple TV.


How to Check Whether a New Device Is Added to iCloud on iCloud.com?

If the device is not at hand, can you check it remotely? Yes, you check whether your new device is added to iCloud on iCloud.com:


Open iCloud.com and enter your Apple credentials. Go to the Settings.


Scroll down to My Devices. Here you will see a list of all the devices that use your Apple ID including their names and models.


If your device is not on the list, click on the View Details button and then answer the security question.


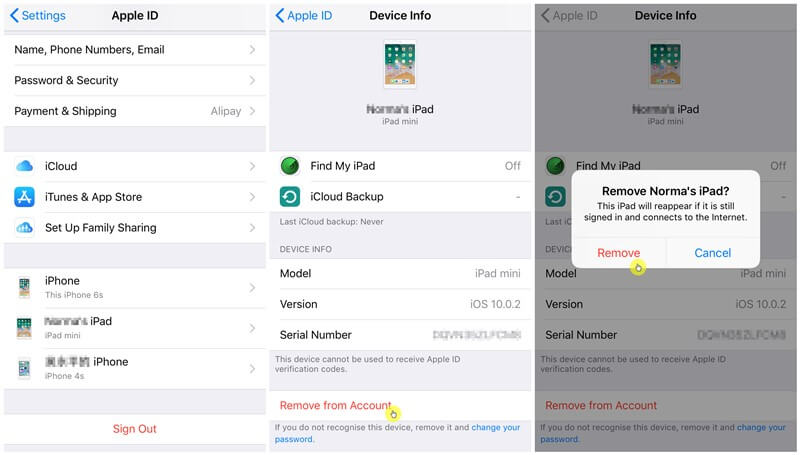
3. How to Remove a Device from Your iCloud Account?

When you lose your iPhone or sell it, the other person can easily access your files on iCloud using your credentials if you still have the device in the Apple ID list. Removing an Apple device that you no longer use from your iCloud account is essential in ensuring that no one gets access to your sensitive and private data. Here is how to remove a device from your iCloud account from your device:


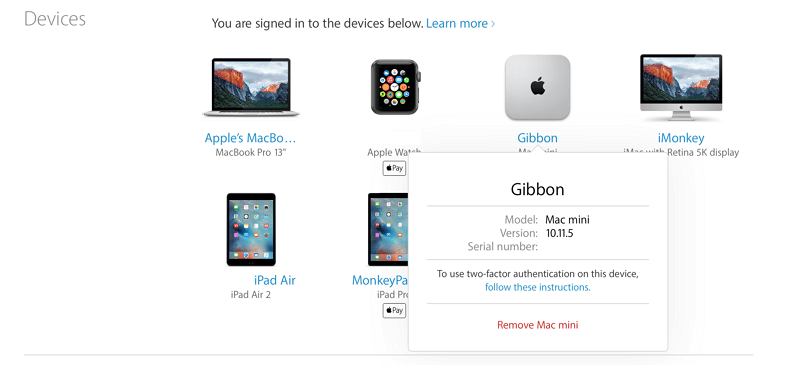
Go to Settings and click on your Apple ID (your name).


Scroll down to find the device you want to remove. Then touch on the device to view its details. If you are sure to remove it, then tap on Remove from Account.


Read the message that appears and then confirm that you want to remove that particular device.


4. Additional Tips about Your iCloud Account

iCloud is a frequently used service and we will tell you some tips about how to use it better.


If you have added a device to iCloud and upload your pictures from the device to iCloud, then how you can get pictures from iCloud? The article tells two ways to get pictures from iCloud.


Wondering whether contacts are included when you back up your device to iCloud? Here the post will give you the answer.


If you encounter a worse situation: you just cannot back up your device to iCloud after adding it to your iCloud account, then learn how to do for iCloud not backing up.


What should you do if you want to restore a successful backup to your device? There are 2 ways to restore iCloud backup to device, even if you are using the latest iOS 12.

iCloud has made data files management easier for iPhone users, no matter you use iOS 12 or any earlier iOS versions. However, it can be difficult to use this service at times. Just follow the methods to add your device to iCloud account and use iCloud service to store and manage your photos, videos, messages with ease.Also Read:jihosoft Free iPhone Data Recovery

Sponsor ads:

Gihosoft Free iPhone Data Recovery:https://www.gihosoft.com/iphone-data-recovery-free.html

Gihosoft iPhone Data Recovery Free

Free iPhone Data Recovery Software for Windows/Mac

Recover up to 12+ types of files, including contacts, SMS, photos, WhatsApp, Viber, notes, etc.

Restore lost data from iOS devices directly or from iTunes and iCloud backup

Recover iPhone data lost due to iOS upgrade/jailbreak, accidental deletion, device lost or broken

Support all the latest iPhone, iPad and iPod Touch

Both Free and Pro version.

If you lost data after you updated to a new iPhone, you can always use Gihosoft iPhone Data Recovery to get the data back from the old iPhone or backup.You may also like: iphonerecovery.com

If you use android phones, please choose Gihosoft Android Data Recovery.

With Gihosoft Android Data Recovery, no longer afraid of data loss!

Must read:Youtube video downloader for pc

Gihosoft RePicvid Free Photo Recovery Software provides a free photo recovery software for windows to help users recover the deleted or lost photo for free.

Jihosoft Android Data Recovery: the best Android Data Recovery software for Windows and Mac to recover deleted contacts, messages, photos, videos, WhatsApp and etc from Android devices.Tips:How to transfer messages from iPhone to iPhone

Wednesday, February 20, 2019

How to Delete Songs from iPhone (only for songs downloadeded from Apple Music) 2019


1 How to Delete Songs from iPhone (only for songs downloadeded from Apple Music)
(1) From Music App

Step 1: Launch the Music app and click “My Music” from the bottom.

Step 2: You can list sort your songs by Artists, Albums, Songs, Genres, etc. Turn on “Only Offline Music” and it will only show the downloaded music.

Step 3: Find out the songs you want to delete and you will see More (...) icon beside the songs. Click on it.

Step 4: Choose “Remove Download” option to delete it from your iPhone.


Note: You need to delete songs one by one in this way.
(2) From Settings App - For All Music At Once

If you have lots of music on your iPhone, or you want to the slate clean. Then follow the steps below:

Step 1: Open the Settings app

Step 2: Go to General, then Storage & iCloud Usage and then Manage Storage. Wait for it to load then tap on “Music”.

Step 3: Tap “Edit” in the upper right corner.

Step 4: Tap the red minus button next to All Songs or the specific artist, then tap “Delete”.


Note: You can only delete all songs at once or delete all songs in the same artist once. But you cannot delete some specific songs selectively.Sponsor ads:How to Turn off Tumblr Safe Mode without AccountMust Read:If you lost data after you updated to a new iPhone, you can always use Gihosoft iPhone Data Recovery to get the data back from the old iPhone or backup.

Gihosoft Free iPhone Data Recovery:iphonerecovery.com

If you use android phones, please choose Gihosoft Android Data Recovery

Sponsor ads:

Gihosoft Free iPhone Data Recovery:iphonerecovery.com

Free iPhone Data Recovery Software for Windows/Mac

Recover up to 12+ types of files, including contacts, SMS, photos, WhatsApp, Viber, notes, etc.

Restore lost data from iOS devices directly or from iTunes and iCloud backup

Recover iPhone data lost due to iOS upgrade/jailbreak, accidental deletion, device lost or broken

Support all the latest iPhone, iPad and iPod Touch

Both Free and Pro version.

If you lost data after you updated to a new iPhone, you can always use Gihosoft iPhone Data Recovery to get the data back from the old iPhone or backup.

Top 10 Best FRP Bypass Tools to Bypass Google Account on Android Device 2019

Worth reading:download youtube 1080p

If you use android phones, please choose Gihosoft Android Data Recovery

Jihosoft Android Data Recovery: the best Android Data Recovery software for Windows and Mac to recover deleted contacts, messages, photos, videos, WhatsApp and etc from Android

Monday, February 18, 2019

Recover Deleted Messages from WhatsApp iCloud Backup 2019


1. Recover Deleted Messages from WhatsApp iCloud Backup

WhatsApp will not save your daily data on its servers, so it can't help you recover deleted messages. However it allows you to back up your chat history and media to iCloud by setting up chat backup on WhatsApp settings.

Step 1: Make sure that you have backed up WhatsApp messages in iCloud or turned on auto backup before. To check this, simply go to WhatsApp → Settings → Chats → Chat Backup.


Step 2: Uninstall WhatsApp and verify your phone number after reinstalling it from the App Store. Then you will see a welcome notice prompting you to restore chat history. Simply tap on Restore Chat History and you shall get back your deleted WhatsApp messages once the restore process is completed.


2. Recover Deleted WhatsApp Messages without Backup (iOS 12 Supported)

Sponsor ads:How to Turn off Tumblr Safe Mode without AccountMust Read:If you lost data after you updated to a new iPhone, you can always use Gihosoft iPhone Data Recovery to get the data back from the old iPhone or backup.

Gihosoft Free iPhone Data Recovery:iphonerecovery.com


If you use android phones, please choose Gihosoft Android Data Recovery

Sunday, February 17, 2019

6 Common WhatsApp Voice Message Problems on iPhone 2019


 6 Common WhatsApp Voice Message Problems on iPhone 2019


6 Common WhatsApp Voice Message Problems on iPhone
1 Voice Messages Stop Recording After 9 Seconds

This is one of the most common problems that WhatsApp users experience. It can be caused when something interferes with the multi-touch functionality on your screen. And such interferences can be caused by a screen protector. If you put a finger on the microphone icon, the screen of your iPhone loses the touch connectivity after ten seconds due to the screen protector. To solve this issue you can place your finger on the microphone icon but try to move it around a bit at the same time so the touch connectivity still works. Or try to remove screen protector and then try again.


2 Unable to Listen to WhatsApp Voice Messages via Bluetooth Earpiece

If you are having trouble listening to the Voice messages via Bluetooth earpiece, unpair and then re-pair the Bluetooth device to see if it helps. To do this go to Settings > Bluetooth and then unpair the devices. Go to Settings > Bluetooth again and then wait for the Bluetooth earpiece to appear on the iPhone screen. Tap on it to pair.


3 WhatsApp Voice Message Is Breaking Up, When Connected the Bluetooth Speakers

This is a problem that most people experienced after upgrading their devices to iOS 11.3. While there is no official solution to it yet, you can try to update or reinstall the WhatsApp app and see if that helps. Or you can contact the customer support team of WhatsApp via Email (support@whatsapp.com) to see if they can sort this out.


4 WhatsApp Voice Message Volume is Low on iPhone 7

This is another problem that happens mostly for iPhone 7 users. In reply of an Email from WhatsApp, they said that the problem is with the iOS system and not the app itself. If you are having this problem, try rebooting your iPhone. You can do this by turning it off, wait 30 seconds and then turn it back on. If that doesn’t work, you may need to update iPhone to latest iOS, i.e. iOS 12, or contact Apple for further assistance.


5 WhatsApp Keeps Crashing and Deleting Messages Automatically

This is a problem that some people have faced when using the WhatsApp app particularly for the group chat function. If this happens to you, the best course of action is to delete the WhatsApp app and then re-install it from App Store. Just be sure to back up your existing messages and attachments before doing this.Restoring Lost Photos and Videos from iPhone

If you have deleted some of your pictures or videos from your gallery, then there is a straightforward way to Recover Deleted Files iPhone back.

After you delete the media files from your gallery, be it photos or videos, then you must know that iOS has a feature that the deleted media files doesn’t get deleted immediately, but it gets compiled to a temporary folder from where it gets deleted after 30 days. If you lost data after you updated to a new iPhone, you can always use Gihosoft iPhone Data Recovery to get the data back from the old iPhone or backup. Should you wish to recover these files, you must go to that “recently deleted” folder and retrieve these files before 30 days.

If you use android phones, please choose Gihosoft Android Data Recovery.

Tuesday, August 14, 2018

HOW TO BACKUP YOUR IPHONE ON ICLOUD & ITUNES 2019


It is very important to backup your phones just in case something happens, the phone could get stolen, it could crash or get damaged. Backing up your phone can save you a lot of headache. The only thing that most people worry about when a phone get’s damaged is how to recover all the data such as pictures, videos, music, contacts etc. In this post I will be showing you how to save all your data. There are two ways to backup your data if you use iPhone, the first is iCloud backup while the second method is iTunes backup.

Option 1: iCloud BackUp

iCloud is so simple and easy to use. When you sign in, you get 5GB of iCloud storage for free. But you know that’s a ridiculous storage space in 2018 where you have phones will 64GB, 128GB etc and it will not be enough back up your entire 16, 32 or 64GB iPhone . If you’re willing to pay a subscription fee of $1 a month, you could upgrade to 50GB of storage. You can even upgrade further to 200GB for $3 and 2TB for $10 per month, quite expensive. This saves everything on your iPhone including the settings, apps and most importantly,music, photos and videos.

How To Set Up iCloud:


Connect your device to a Wi-Fi or mobile network. Preferably 3G or 4G network.

Go to Settings > [your name], and tap iCloud. If you’re using iOS 10.2 or earlier, go to Settings, then scroll down and tap iCloud.

Tap iCloud Backup. If you’re using iOS 10.2 or earlier, tap Backup. Make sure that iCloud Backup is turned on.

Tap Back Up Now. Stay connected to your Wi-Fi or mobile network until the process completes.

To check progress and confirm that the backup is successful: Go to Settings > [your name] > iCloud > iCloud Backup. Under Back Up Now, you’ll see the date and time of your last backup.

Option 2: iTunes BackUp

iTunes lets you store as much data as you want for free, and it’s only for iPhones of course. The biggest downside, you have to do it all manually:


Open iTunes and connect your iPhone to your computer.

A message will pop up, asking if you want to Trust This Computer, tap “trust” or “allow”.

Select your iPhone when it appears in the sidebar of iTunes.

Click Back Up Now.For now, check:Free iTunes/iPhone Backup Extractor for iPhone, iPad

Jihosoft iTunes Backup Extractor is a powerful tool to recover and extract important data from iPhone, iPad & iPod touch backup on Windows or Mac.

The main advantage of iTunes is that it has free unlimited storage and saves everything on your phone.

Sunday, June 10, 2018

How to Remove Passcode from iPhone (iPad)


How to Remove Passcode from iPhone (iPad)


If you want to remove passcode from your iPhone or iPad, then it is recommended that you use the DFU mode. This is a common method to remove the passcode that many iOS users use. Follow these instructions:


Step 1. Connect your iPhone to your PC and open iTunes.


Step 2. Once your iPhone is detected in iTunes, open DFU mode on the device. Different iPhones require different methods to go into DFU mode. On iPhone 7/7 Plus, you will need to press the Volume Down and Side button and hold them until a recovery-mode screen appears.


Step 3. When an option to Update or Restore appears, choose Restore.


Step 4. iTunes will now begin the restoring process and download software for your device. Once the process is completed, the passcode will be removed and you will be able to set up your device with ease.


Do you like this story?


Sponsor Ads:
Gihosoft iPhone Data Recovery is a professional iPhone Data Recovery software to get back all your lost text message, photo, video, call history, note, contact and more from iPhone/iPad/iPod Touch. It offers a full solution to recover your lost data in different tough situations. Besides recovering data directly from iPhone, iPad and iPod touch, it also allows you to recover data from iCloud and iTunes backup files.

Tuesday, August 29, 2017

6 drastic changes those are coming to your iPhone with iOS 11

iOS 11 has been released at WWDC 2017 and the new OS is full of new and improved features.


If you own an iPad, iOS 11 is especially important. Many of the biggest changes introduced with this version of the iOS are designed to make the iPad an even-more-powerful productivity tool, maybe one that can even replace a laptop.

Today in this article, we are going to talk about 6 drastic changes those are coming to your iPhone with iOS 11.

Must Read: iOS 11 beta 7 introduced awesome new feature which will come to your iPhone

Instantly share WiFi passwords


Soon, you'll no longer need to save your WiFi password on a wrinkled piece of paper in a drawer somewhere. In iOS 11, if you need a WiFi password for a given network, just find someone who is already using the network and hold your device near theirs. The password will be transferred instantly.

The volume box is moving out of your way

Whenever you change the volume on your iPhone or iPad, a translucent box pops up in the middle of the screen. It's a bit annoying. Thankfully, Apple is redesigning the volume box in iOS 11.


New feature that could actually save your life

Distracted driving is a real, deadly problem. Thankfully, Apple has added a clever feature that lets the iPhone since it’s in a car to trigger “Do Not Disturb” mode, which can hide notifications for texts, calls, and other app messages while you’re driving. The feature can even notify people that you’re driving and will contact them soon.

Must Read: iPhone 8 concept design which will blow your mind

Notifications are getting simplified


In iOS 11, all your notifications — both recent and missed — are in one place; no separate tabs. Just pull down from the top of the screen to see everything at once.

iPhone keyboard is getting smarter

One of the signature features of Google Now is finally coming to the iOS ecosystem: When you type in iOS 11, the keyboard will suggest words you may have recently viewed on your phone from your Messages app, for example or Safari. So when your friend texts you the name of a restaurant, it may be one of the first suggestions when you start searching for that restaurant on the web. Also, the keyboard can now be used with one hand just hold the emoji key and select one-handed typing to move all the keys closer to your thumb. Jihosoft iPhone Backup Extractor Extract and recover all types of data from iPhone backup files, such as camera roll photos, videos, SMS, contacts, reminders, WhatsApp, and etc.
Gihosoft Free iPhone Data Recovery is a professional iPhone Data Recovery software to get back all your lost text message, photo, video, call history, note, contact and more from iPhone/iPad/iPod Touch.


Must Read:How to recover deleted text messages on iPhone 6 ?

Must Read: 8 iPhone & iPad features that will be added with iOS 11

Messages app is getting cleaned up


It felt like mayhem when Apple added the app drawer to its Messages app. Suddenly, you could add stickers and GIFs and all sorts of buttons and visuals to your messages, but all the new options weren’t totally easy to find and were somewhat overwhelming. Apple redesigned the app drawer in Messages for iOS 11, making it much easier to browser all the various stickers and emojis at your disposal.

Monday, August 28, 2017

How To Get Back Apple's Live Fish Wallpapers on Your iPhone in iOS 11 ?


How To Get Back Apple's Live Fish Wallpapers on Your iPhone in iOS 11


In the latest beta for iOS 11, Apple removed the live fish wallpapers from the iPhone, so you can no longer set them as a live photo for your lock screen. If you really loved those fishies and want to see them animating again on your device, there is a way to get them back. Must Read:iMyFone D-Back iPhone Data Recovery–Recover Deleted Data from Your iPhone/iTunes/iCloud Easily!


While these are the original video files we'll be using for the fish animations, they won't act exactly like Apple's stock live wallpapers when we're done.
Apple's default live wallpapers not only animate when you use 3D Touch on the display, but they move faster or slower depending on how much force you apply. When you lift your finger off the screen, the animation reverses back to the first frame. The only way to simulate this right now is by using a jailbreak tweak, and there is no public iOS 11 jailbreak yet.
So our version of these fishy live wallpapers will act just like normal live photos that you turn into live wallpapers on your iPhone. They will animate when you use 3D Touch, but they will stop playing when they reach the end of the video, and they won't reverse back to the first frame.
Step 1Download the Fishy Files
There are six live fish wallpapers that Apple removed in iOS 11, and all of them are linked individually below as .m4v video files. So just choose the ones that you like or download them all in a .zip file. If you choose the .zip file, you'll want to choose "More" in Safari, then "Save to Files." Then you can select "Preview Content" when viewing the .zip in the Files app, and use the share sheet to save each video to your Photos app.
Orange Fish on White Background
Light Blue Fish on White Background
Blue/Orange Fish on White Background Must Read:iMyFone D-Back iPhone Data Recovery–Recover Deleted Data from Your iPhone/iTunes/iCloud Easily!


Blue/Yellow Fish on Black Background
Blue/White Fish on Black Background
Blue/Red Fish on Black Background


Step 2Install a Video-to-Live-Photo Converter
In order to turn the .m4v video files into live photos, we'll need to use a conversion app. There are some good paid ones in the iOS App Store, but free is always better. You could use Live Maker or LiveMaker Free, but intoLive Pro has slightly better quality and more options for your finished product, so I'd recommend that.
Install intoLive Pro from the iOS App Store for free


Convert the Videos to Live Photos
Open up the intoLive Pro app, make sure the "Video" tab is selected, then choose the fish video file you want to convert. On the edit screen, just tap the right arrow in the top right, then select whether or not you'd like to repeat the animation. You can make it play once, twice, or three times in a row.
After you've made your choice, tap on "Save Live Photos" on the next screen and it will be saved to your Photos app as a live photo.


Step 4Set as Your Live Wallpaper
You can set your new live fish photo as your wallpaper by going to "Wallpaper" in the Settings app, selecting "Choose a New Wallpaper," and selecting your live photo. In this guide, however, I'll show you how to do it straight from the Photos app, so go ahead and open that up.
Open up the live photo, then tap the share sheet icon in the bottom left. On the bottom row of options, tap the "Upload as Wallpaper" option, then tap "Set." On the prompt, select "Set Lock Screen" and you're done.


Who knows, maybe Apple will bring back the live fish wallpapers in an update. If so, we'll update this guide accordingly. But chances are that Apple is readying some new live wallpapers for iOS 11's big public release.

3 Ways to Find Apple ID Password

Find Apple ID Password from Two-factor Authentication for iOS 10 or Later Two-factor authentication on your iPhone or iPad is extra security...